Mastering CBCT: Fundamentals of 3D Radiography
· David Hanning
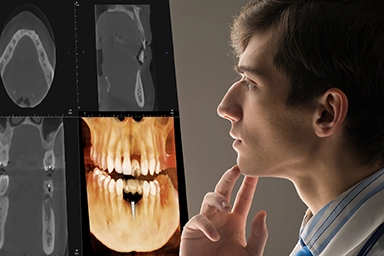
Welcome to the remarkable world of dental imaging, where we’re revolutionizing the way we perceive dental structures and diagnoses. This realm isn’t spun from the threads of science fiction but is the product of continuous advancement in dental imaging technology. As someone with thirty years of experience in this field, I have been privileged to witness and contribute to this exciting transformation.
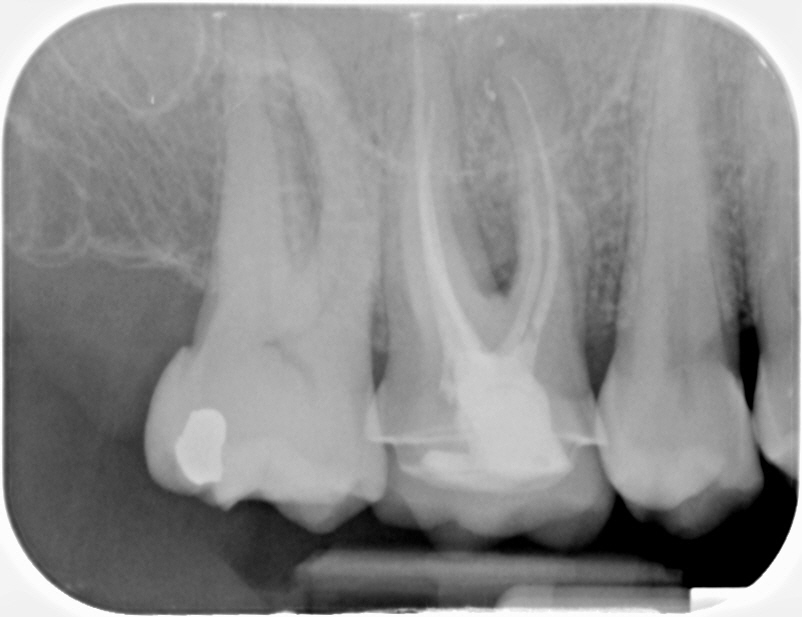
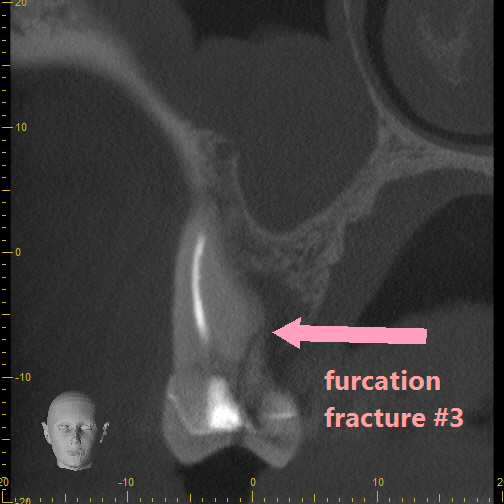
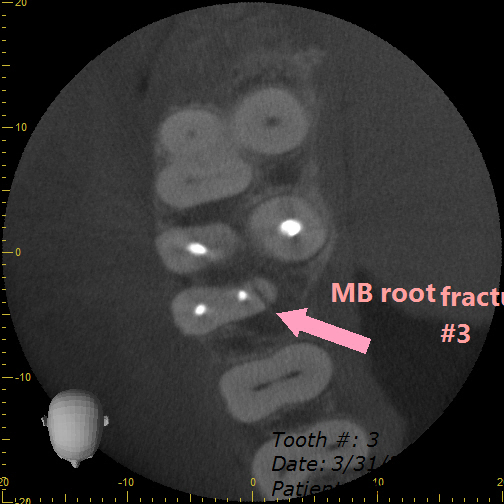
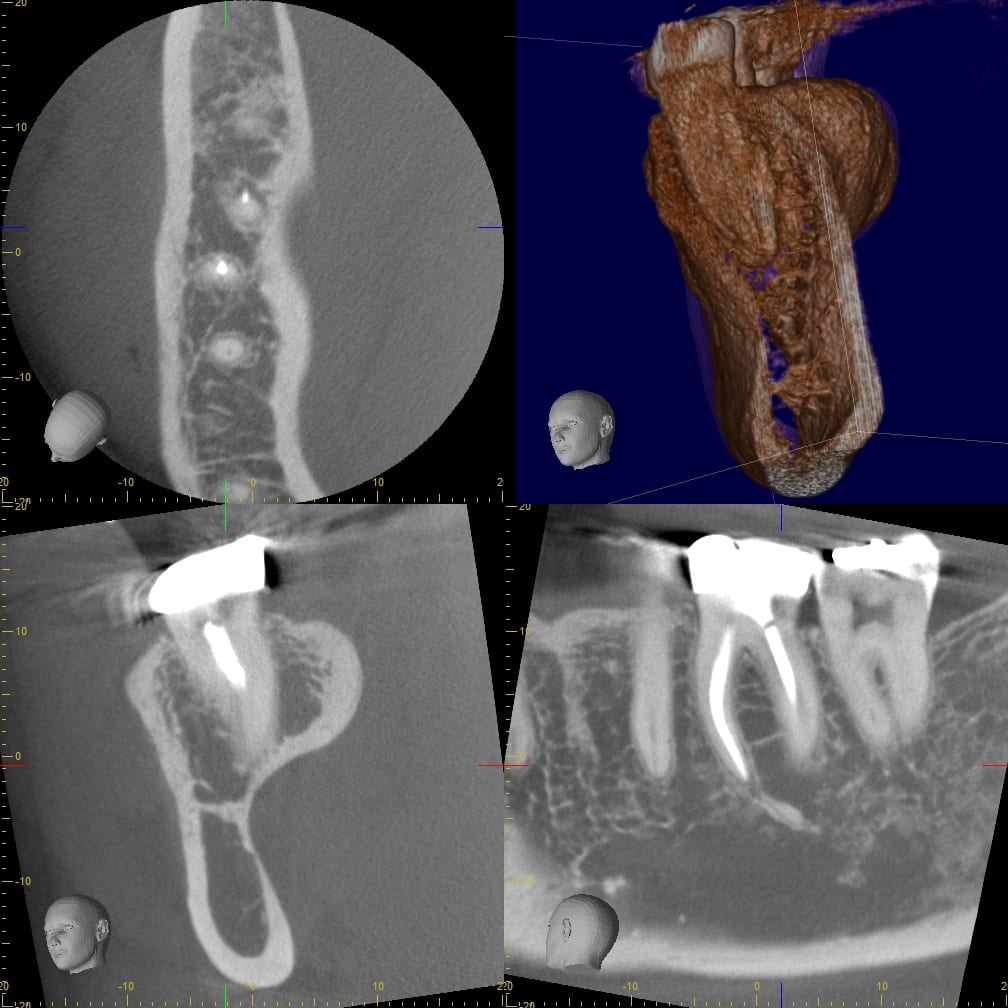
During a recent consultancy at a client’s office, I found myself at the epicenter of a fascinating case study. The focal point was tooth #3, a molar still echoing with the discomfort of a past root canal procedure. The initial suspicion pointed towards a fracture in the mesial root and a concealed furcation. The traditional 2D radiograph provided a basic outline of the issue but lacked the resolution to present a detailed picture of the extent and exact location of the damage.
#3 Mesial Root Fracture and Furcation
 Fracture on Mesial Root
That’s when CBCT, Cone Beam Computed Tomography, made its grand entrance. With its superior 3D imaging capabilities, it illuminated the case, revealing the specifics of the damage that were hitherto shrouded in ambiguity.
Coronal View Showing Fracture and Furcation
Axial View Showing Precise Location of Fracture
While discussing the case, my client voiced a profound observation: “The better the information, the better the treatment.” It was a simple, yet insightful sentiment underscoring the importance of accurate and comprehensive data. High-quality imaging technology, in this regard, is the cornerstone for successful treatment outcomes.
CBCT is swiftly becoming the gold standard in various dental procedures - from surgical to endodontic to orthodontic. Dentists are coming to understand that 3D imaging unveils critical radiographic details that might elude a 2D radiograph, hence making it a critical tool for successful treatment planning.
Whether you’re exploring the potential of cone beam imaging or considering investing in a CBCT device for your practice, you have arrived at the right destination. Welcome to “Mastering CBCT: Essential Fundamentals for Successful 3D Dental Radiography”. Let us embark together on this journey into the future of dental imaging and understand fundamentals for success. But, remember Mastering CBCT is a journey and not a destination, to be a true master, commit to continuing education.
The following are 10 fundamentals that will help you on the path to becoming a masterful user of 3D CBCT.
1) Understand FOV, Three Views, Volume Rendered View, and how Window Leveling Works.
Choosing the correct FOV or Field Of View is key to taking the best scan for the situation. On one end of the spectrum, you have small (e.g. 40mm X 40mm) FOV for endodontic procedures. On the other end, you may have a large 17mm X 20mm FOV for Orthodontic applications. This is an important decision point in CBCT for your practice. Get a machine that has all of the available FOVs for the procedures that you perform.
40X40 FOV Suitable for Endodontic Procedures
90mm X 160mm Medium CBCT Scan for Implants
160mm X 185mm Large CBCT Scan for Airway
Understanding the Axial, Coronal, Sagittal, and Volume Rendered Views is key to navigating CBCT Volumes.
The Axial view, often referred to as the transverse view, gives us a bird’s eye view, much like peering down from the top onto a horizontal slice of the anatomy. It’s exceptionally useful in assessing the width and depth of the structures such as the jaw’s width, sinus locations, or impacted teeth positions.
The Coronal view, a frontal projection as if face-to-face with the patient, helps evaluate the height of the anatomical structures, making it invaluable in assessing vertical bone height for implant placements, pinpointing the extent of periapical lesions, or visualizing the nasal cavity and maxillary sinuses.
The Sagittal view, a side-on view akin to standing beside the patient, allows an understanding of the length of the structures. This view becomes crucial in assessing anterior-posterior relationships, gauging the mandibular canal’s proximity to potential implant sites, or determining the extent of pathology in the anterior-posterior dimension.
In CBCT imaging, the Volume Rendered View is akin to the crowning jewel. It produces a three-dimensional rendition of the scanned volume, showcasing the spatial relationships between different anatomical structures in an explicit way. This 3D view becomes indispensable when planning surgical procedures like virtual implant placements and is equally beneficial for explaining complex treatment plans to patients in a manner that’s easy to grasp.
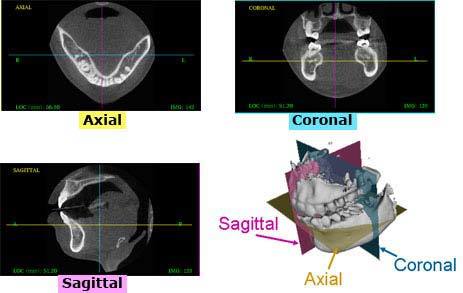
The Four Views Axial , Coronal, Sagittal, and Volume Rendered Views (shown above)
Lastly, adjusting window leveling in CBCT imaging is a significant practice. It allows you to tweak the image contrast, brightness and gamma, thereby highlighting or obscuring specific details. This capability can be instrumental when you’re trying to get a better look at a particular region or structure within the scan.
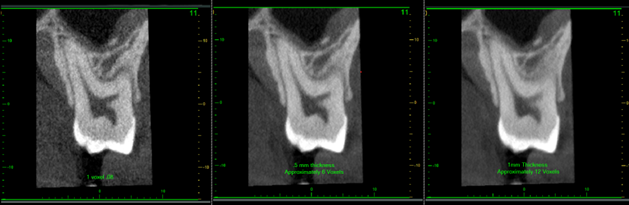
2) Recognizing Slice Thickness and Knowing When and Why to Adjust It.
Slice thickness determines the level of detail captured in an image. Thinner slices yield higher-resolution images but increase the scan time and radiation dose. Understanding when to adjust slice thickness—like needing detailed views for complex cases or broader views for preliminary examinations—is crucial for optimal imaging. Thinner slices allow for taking in finer details as thicker slices can obscure finer details like fractures or MB2 canals.
The image presented at 1 voxel, 6 voxels, and 12 Voxel Thickness (1 voxel=.075mm)
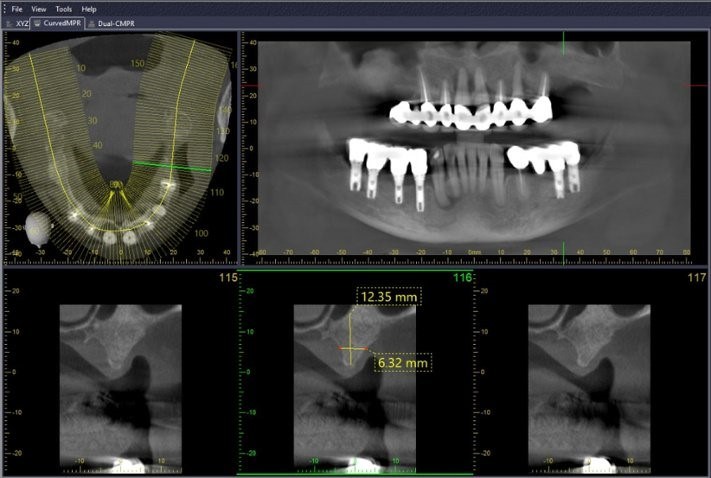
3. Comprehending What an MPR Line is, and Learning How to Use It Effectively
MPR (Multi-Planar Reconstruction) lines allow for interactive viewing of the anatomy in a plane other than the original axial, sagittal, and coronal planes. It helps visualize structures in the desired orientation, especially useful for understanding complex anatomical relations or pathologies. The user can specify a path along any axis and the software will create slices of thicknesses and intervals defined by the user. Utilizing an MPR line can be helpful in many procedures where the user defines the path of the slices.
Using an MPR Line and Slice to Evaluate Bone Height and Width for Implant Selection
4. Correct the orientation of teeth to avoid parallax error. How to get accurate measurements.
Parallax error occurs when scans of teeth or implants are misaligned, leading to inaccurate measurements. It can compromise treatment planning and outcomes. To avoid this error, it is essential to ensure that the long axis of the tooth being measured is perpendicular to the floor.
Imagine trying to measure the length and angle of a tooth that is tilted or angled relative to the floor. When viewed from different angles, the perspective of the tooth changes, causing distorted measurements. This is similar to how an object can appear differently when viewed from various positions. By aligning the scans properly and ensuring the tooth’s long axis is perpendicular to the floor, parallax errors can be minimized, resulting in more accurate measurements.
Accurate measurements are crucial in dentistry, particularly for implant placement. Misaligned scans can lead to implant misplacement or inadequate support, affecting the success of the procedure. By understanding and avoiding parallax errors, dental professionals can provide precise treatment plans and successful dental procedures, ultimately benefiting the patients.
Perpendicular alignment of the implant to the floor allows for accurate measurement

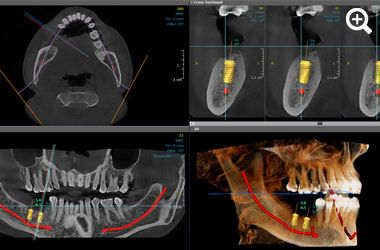
5. Locating and Mapping the Mental Foramen, Identifying the Sinuses, and Measuring to Prevent Perforations.
These anatomical landmarks are vital when planning for procedures like implants or extractions. Accurate identification of the mandibular canal and the floor of the sinus allows for measurements to prevent complications such as nerve damage or sinus perforations.

Example of Mandibular Canal Tracing for Implant Placement
6. Evaluating the Implant Site, Choosing, and Virtually Placing It.
CBCT allows a comprehensive evaluation of the implant site, including bone quality and quantity, adjacent anatomical structures, and potential obstacles. It also facilitates virtual placement of the implant, aiding in precise pre-surgical planning. In the above image of the mapping of the mandibular nerve an implant has been virtually placed that is a virtual copy of the implant that will be placed. Showing the patient the virtual implant planning is a great way to instill patient confidence in the procedure outcome. The old adage “seeing is believing” rings true.
7. Assessing the Quantity and Quality of Bone
A successful implant procedure relies on adequate bone quantity and quality. CBCT provides detailed images of the bone, allowing assessment of its density, thickness, and other factors that can influence the stability and success of the implant. Certain implant planning software, like “OnDemand3D,” provides a 3D depiction of the implant and the surrounding bone quality. Many software packages offer simulated Hounsfield measurements that enable bone density assessments. Learning to use the tools associated with measuring bone quality is an important part of CBCT mastery.
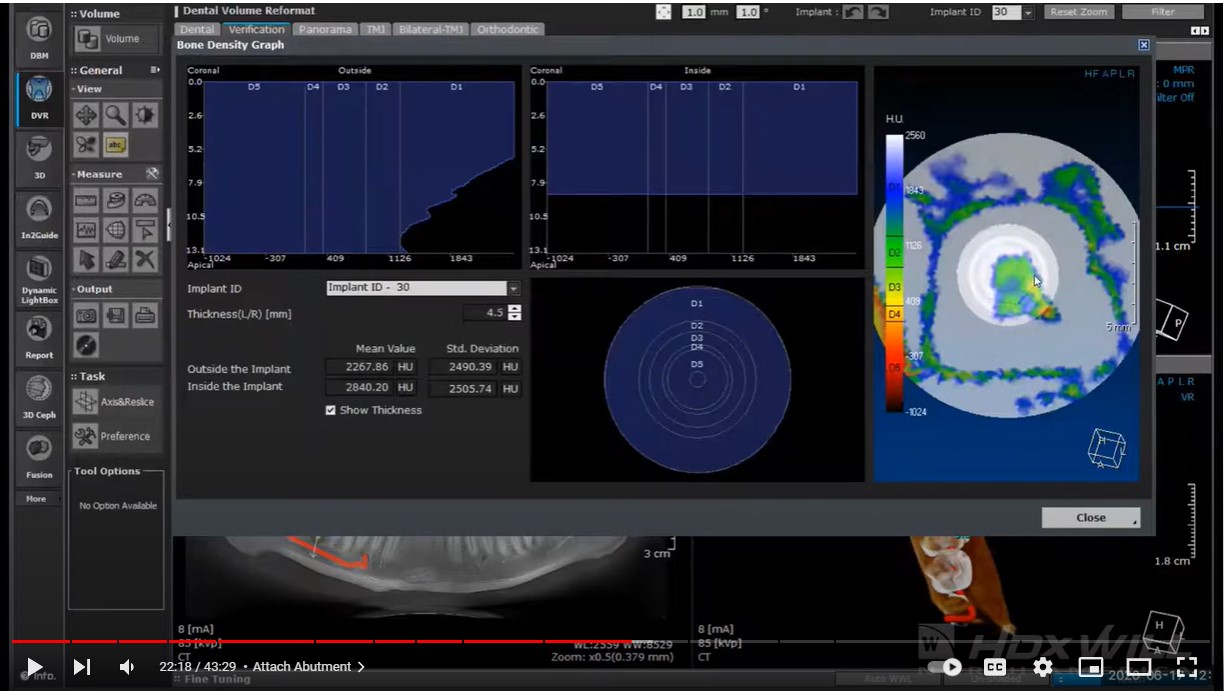
Bone Density Graph for Implant Evaluation (shown above)
8. Producing 2D Screenshots for Reports or Sending to Patients or Specialists.
CBCT software usually includes tools to capture 2D screenshots of specific views. These images can be used in patient education, documentation, or communication with other healthcare providers, enhancing understanding and collaboration. If the tools are not present in the CBCT’s software to snip images than Microsoft’s free “snipping tool” can be used to take quick screen snips of images to be sent to specialists, insurance, or the patient.
An Example of a Snipped Image Used to Illustrate Resorption (shown above)
9. Understanding DICOM Export and Exporting with a Viewing Program.
DICOM (Digital Imaging and Communications in Medicine) is a standard format that allows the sharing and viewing of medical images on different systems. Knowledge of DICOM export and how to include a viewing program facilitates efficient collaboration and consultation with specialists.
Some recipients such as dental labs, will require DICOM information as they will have their own planning software. If a patient requests a 3D volume, they will want a viewing program to accompany the data so they can manipulate the images. The CBCT system that you choose should have both export options, DICOM and volume plus a viewing program. Learn how to export in both ways depending on who is receiving the information.
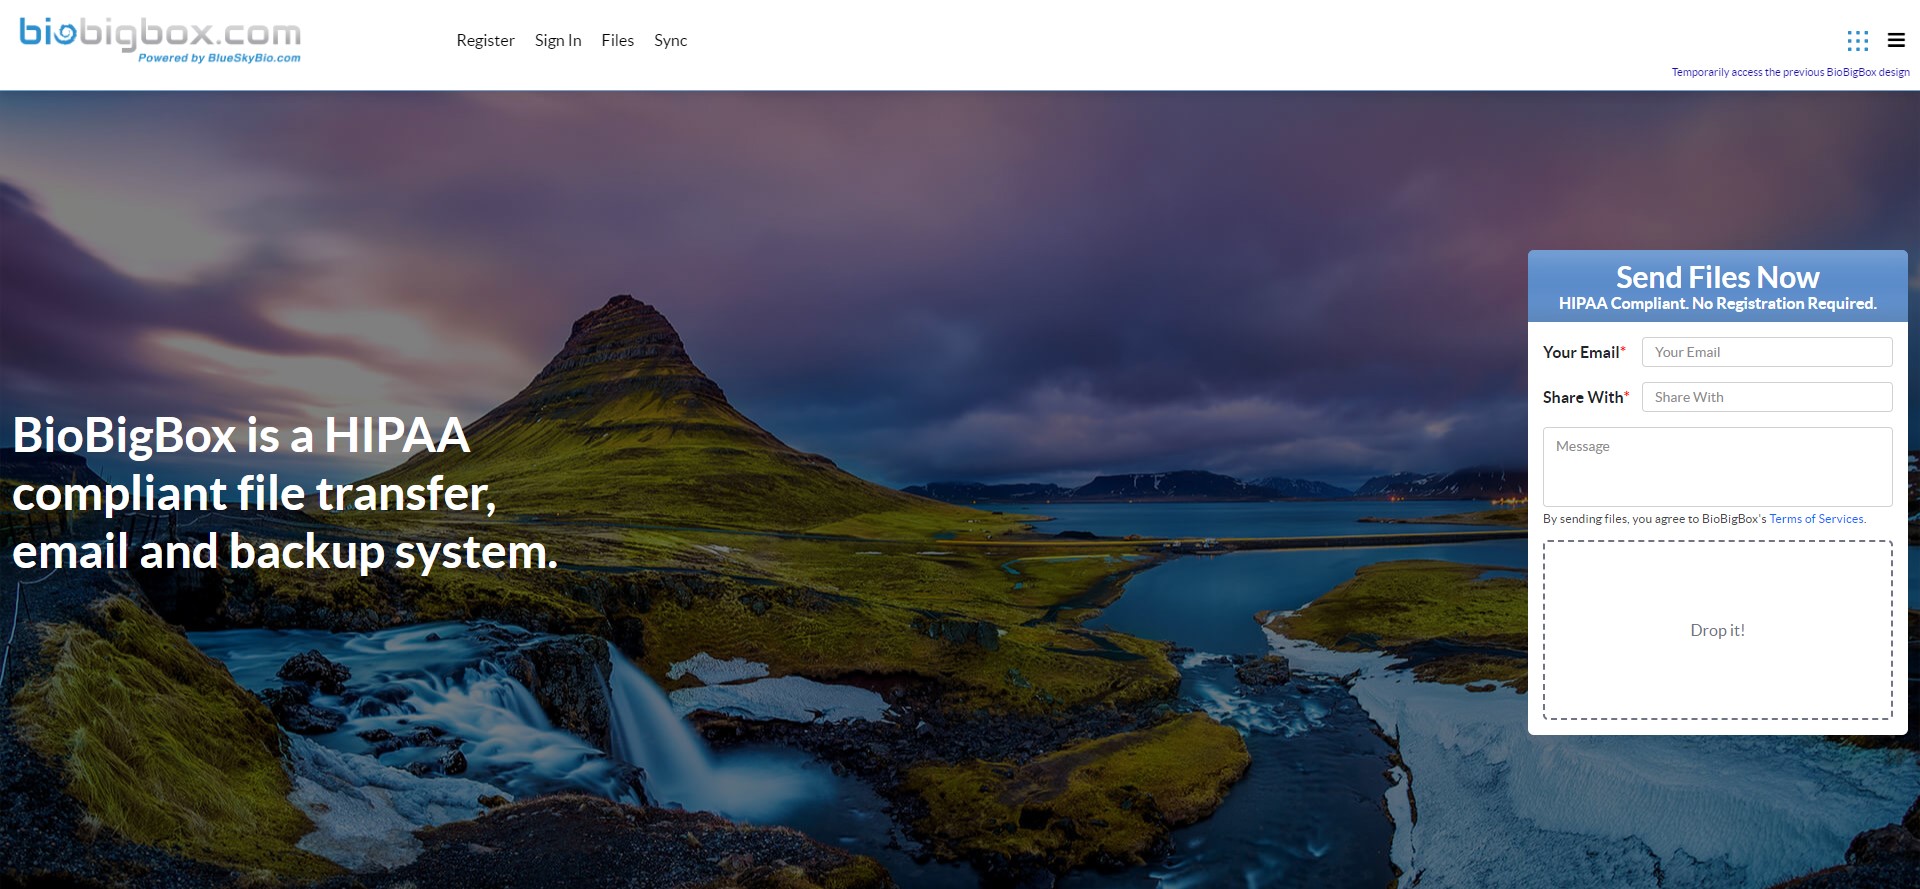
10. Exploring HIPAA-Compliant File Sharing.
HIPAA (Health Insurance Portability and Accountability Act) regulations ensure the protection of patients’ private health information. Adhering to these rules during digital file sharing is critical to maintain patient confidentiality and avoid legal issues. Knowing secure, HIPAA-compliant platforms for file sharing is an integral part of modern digital dentistry. If you are sending images and information related to patient health history, ensure they are sent in a HIPAA-compliant manner. BioBigBox is a HIPPA-compliant file transfer, email, and backup system that is free of charge until a certain storage amount is reached. Check it out at BioBigBox.
As we conclude our voyage through the fascinating world of CBCT imaging, it’s clear that this technology is more than a mere tool - it is a game-changer in the realm of dentistry. It’s a medium that allows us to delve deep into the intricacies of dental structures, revealing information that was once beyond our reach. By understanding the ten fundamentals of CBCT we’ve explored together, you are now well-prepared to harness the full potential of this revolutionary technology. But remember, mastering CBCT is not a destination but a journey. The more we employ it, the more we understand its nuances, and the better we get at interpreting its output. Constant learning and practice will enable you to tap into the full spectrum of benefits CBCT can bring to your practice, and ultimately, to your patients.
Welcome to the future of dentistry, and remember, every image you take is a step closer to perfecting your practice. As always, we are here to support you on this exciting path. Should you have further queries or would like to discuss the right CBCT for your practice, don’t hesitate to reach out. Keep learning, keep growing, and here’s to the countless smiles you’re going to brighten along the way.