The Art of Image Acquisition in Dental Radiology: A Professional's Guide
· David Hanning
 Professional Imaging improves communication and diagnoses.
In the rapidly advancing field of dental radiology, mastering the art of image acquisition is essential for delivering precise and reliable diagnoses. This guide explores the fundamental principles of capturing superior images across various dental imaging modalities, including intraoral cameras, X-rays, CBCT, and panoramic imaging. By understanding the nuances of exposure levels and patient positioning, dental professionals can optimize the clarity and diagnostic value of their images. From reducing motion blur with intraoral cameras to ensuring correct exposure for detailed X-rays, this post offers actionable insights to enhance image quality. Join us as we delve into the techniques that transform routine imaging into a powerful tool for clinical excellence.
Intraoral Camera Techniques for the Best Image
Intraoral cameras have revolutionized dental imaging, allowing for detailed visualization of oral structures. This section explores key techniques for capturing high-quality intraoral images, essential for accurate diagnosis and patient education.
Stabilization for Clear Imaging
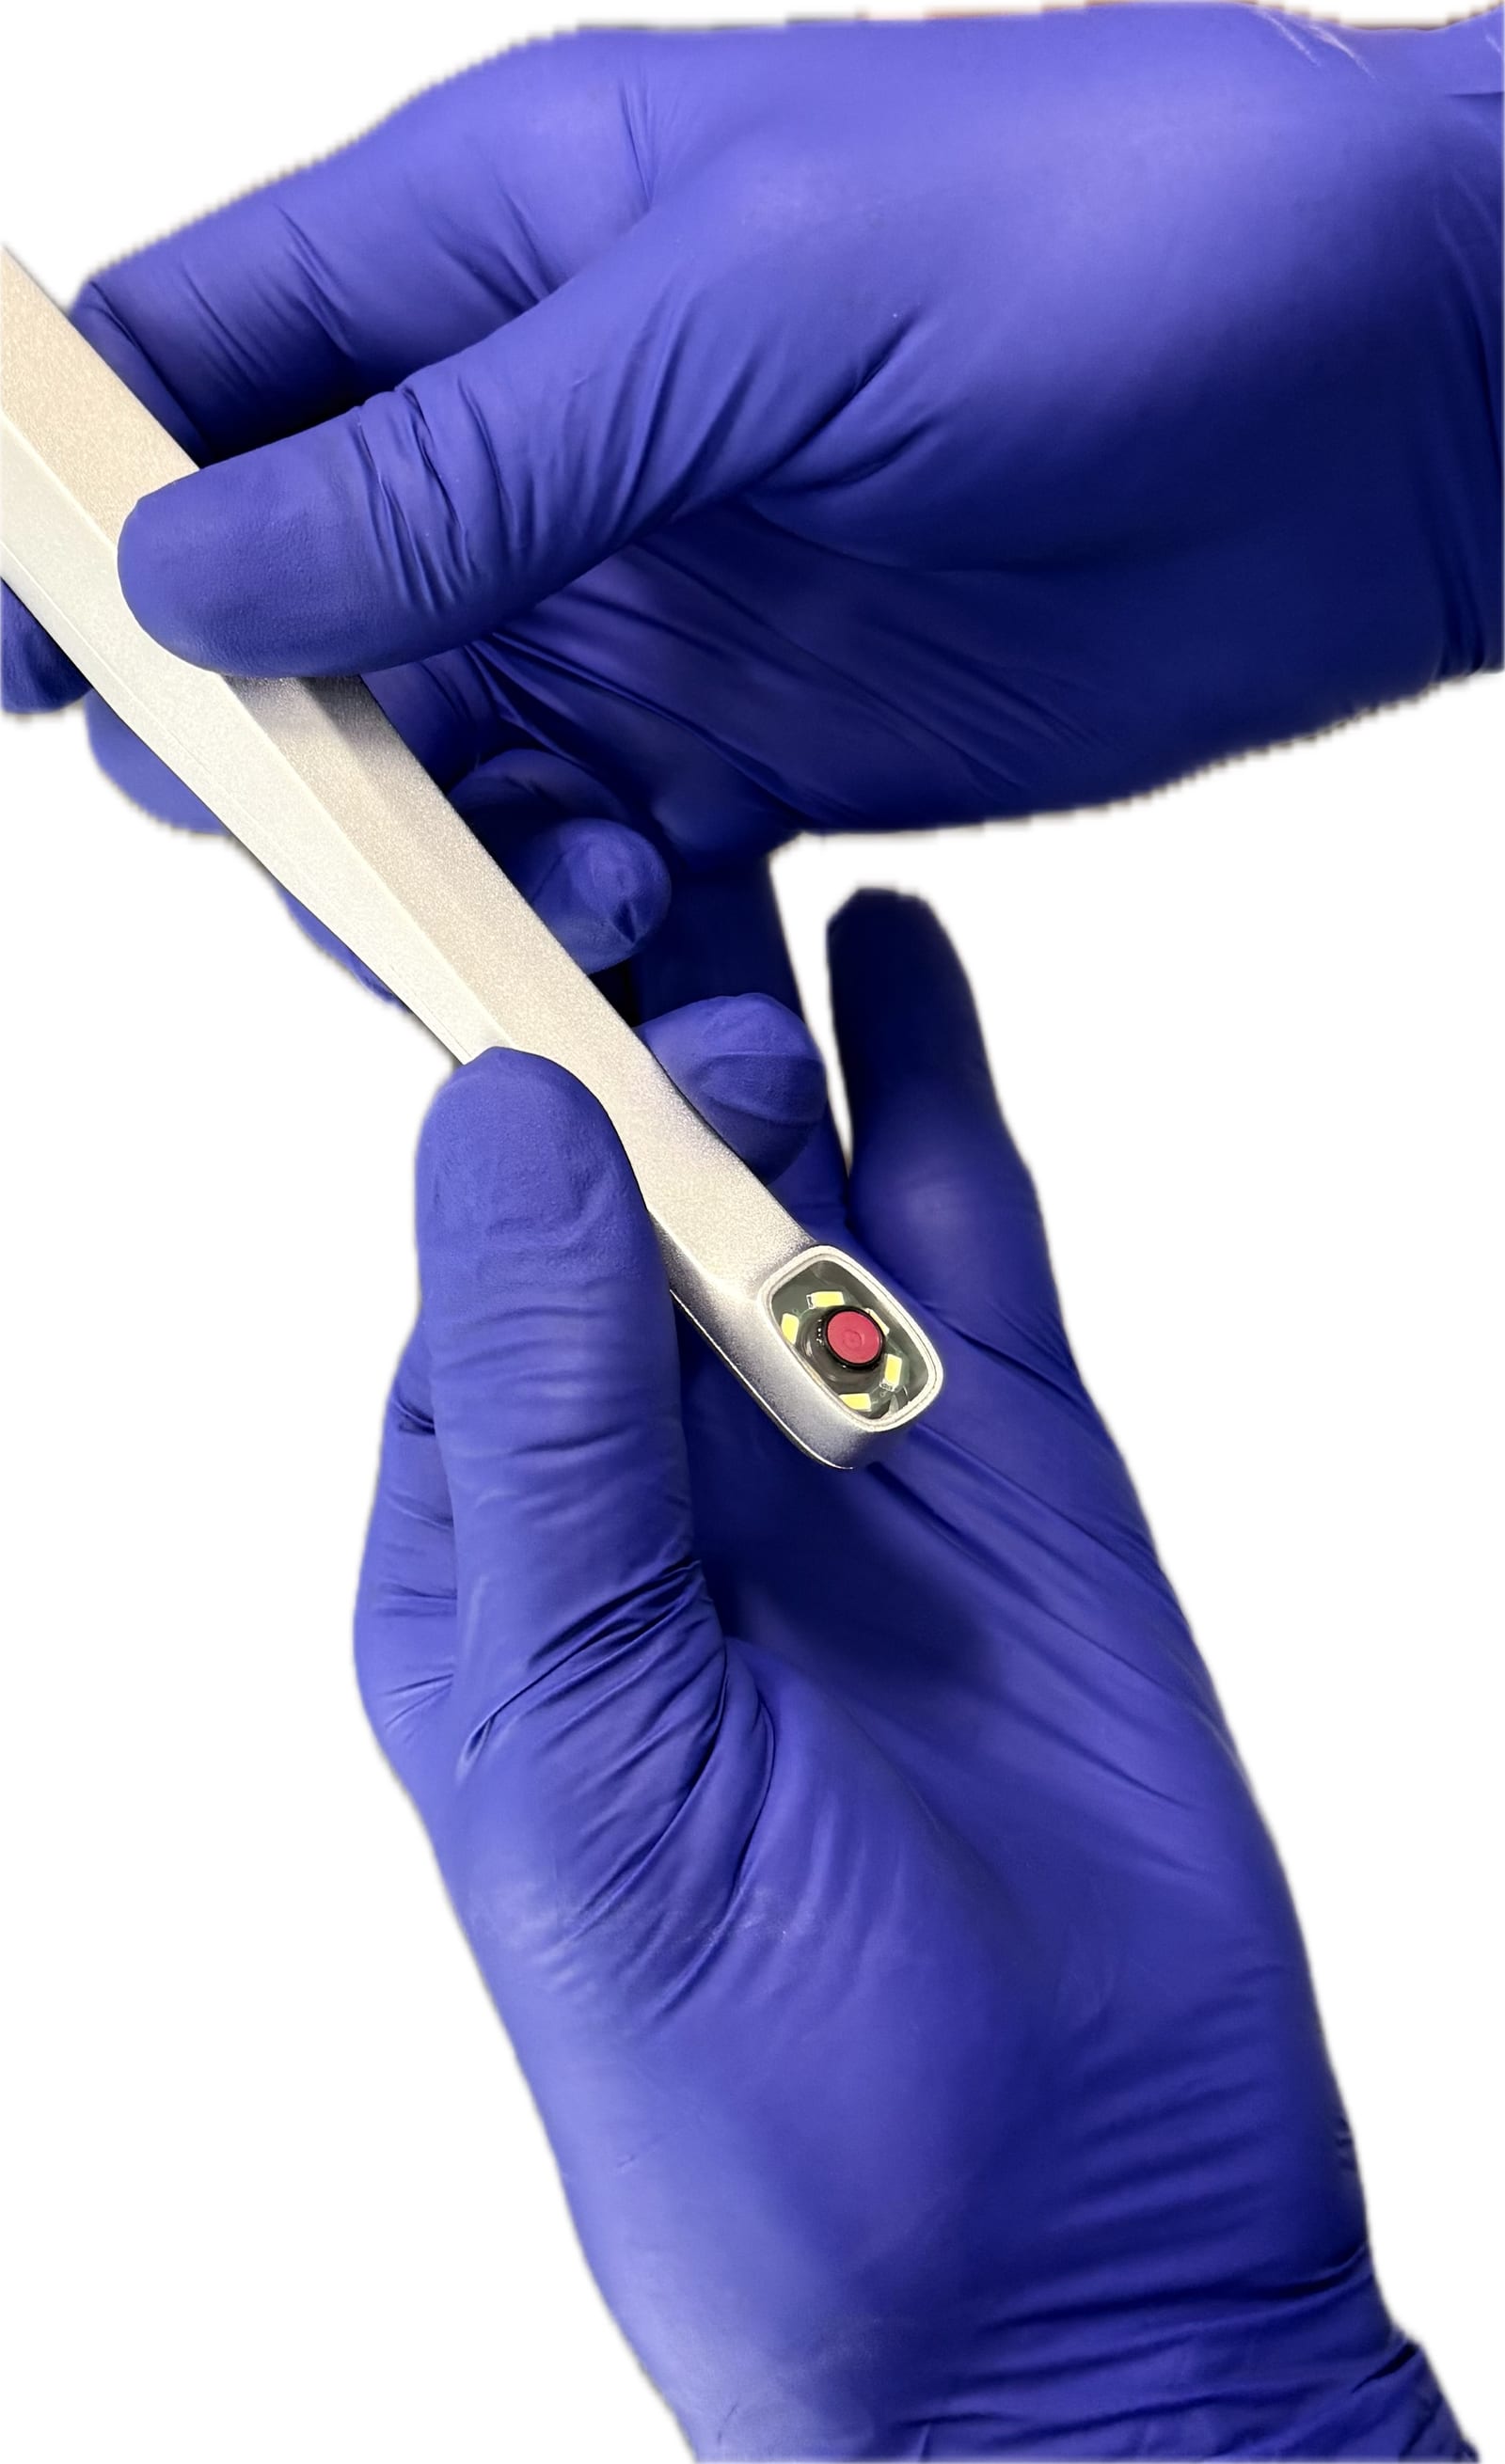 Hold camera with two hands for stability
Stabilization is crucial for obtaining sharp, clear intraoral images. Proper technique minimizes motion blur and ensures diagnostic quality.
- Hold the camera with two hands. Pinch wand part of the Intraoral camera and hold the body of the camera while having a finger over the capture button.
- Brace against the arch opposing the teeth being imaged for a 2-3 tooth view. Gently rest the camera on the same arch of the teeth being imaged to fulcrum closer for a single tooth view.
- Maintain a comfortable grip: Hold the camera firmly and maintain contact with the capture button to freeze the image when ready.
Patient cooperation is also vital. Instruct patients to remain still and breathe normally through their nose during image capture.
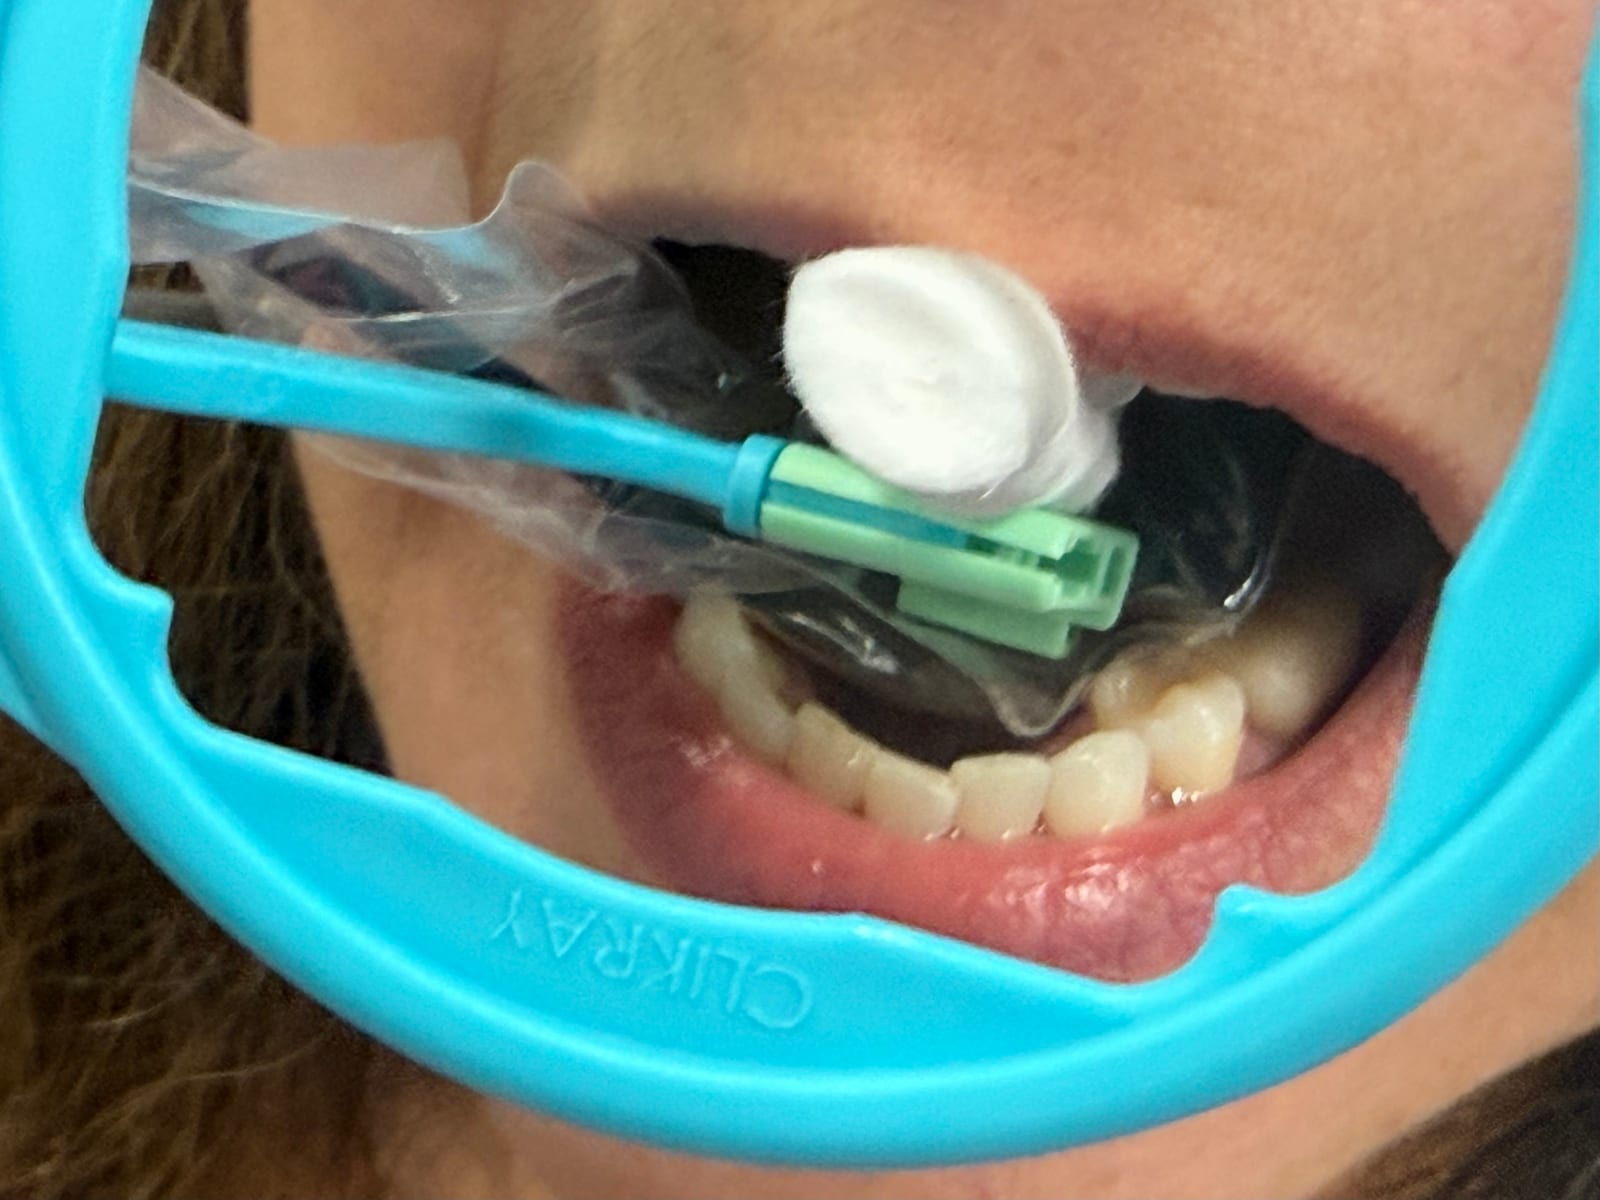
Preparing the Field for Imaging
A clean, dry field is essential for optimal intraoral imaging. Proper preparation enhances image clarity and reduces the need for retakes.
Start by thoroughly drying the area with air. This removes saliva and moisture that can cause glare or distortion. Use the air to dry tooth surfaces before imaging.
Next, if needed, use cotton rolls or gauze to isolate the area from saliva. Position these carefully to avoid obstructing the view. A cotton roll in the cheek when imaging a posterior molar can greatly reduce saliva which obscures detail and causes glare in the image.
For posterior images, consider using a cheek retractor to improve access and visibility. This also helps prevent fogging of the camera lens.
Framing for Accurate Diagnosis
Proper framing ensures that intraoral images capture all necessary information for accurate diagnosis and treatment planning.
Center the area of interest in the frame, ensuring it occupies the majority of the image. Include enough surrounding structures for context and avoid unnecessary elements that may distract from the main focus. For 2-3 tooth views ensure that all teeth imaged are clear and centered.
For single tooth images, ensure that the area of concern is dry and fully in focus. Adjust fulcrum until ideal focus is achieved.
For future exams, maintain a consistent distance and angle across multiple images to facilitate comparison. This is particularly important when monitoring conditions over time.
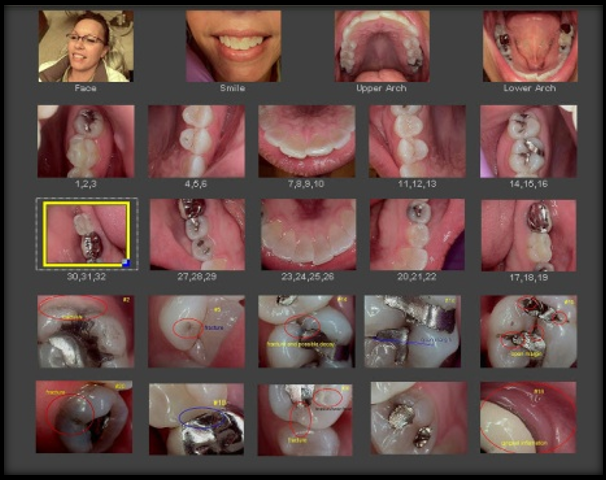 A complete camera exam with images in focus and properly framed.
Techniques for Crystal Clear Intraoral X-rays
X-ray exposure optimization is critical for producing high-quality diagnostic images while minimizing radiation dose. This section covers techniques for achieving the ideal balance of detail and safety in dental radiography.
Exposure Levels for Different Regions
Different areas of the mouth require varying exposure levels due to differences in tissue density and thickness.
Upper posterior region: Typically requires the highest exposure due to dense bone structure. It is typically 2X the exposure of the lower anterior region.
Lower anterior region: In general, needs the lowest exposure due to thinner bone and less soft tissue. 1/2 the exposure of an upper posterior PA.
Upper anterior and lower posterior regions: Usually require intermediate exposure levels. These levels fall between the upper and lower settings.
Maintaining consistent distance close to the skin is critical for consistency and the image presets to be accurate.
Adjust your X-ray machine’s settings according to these guidelines:
| Region | Relative Exposure Level |
|---|---|
| Upper Posterior | High e.g. 20ms |
| Lower Anterior | Low e.g. 10ms |
| Upper Anterior | Medium e.g. 16ms |
| Lower Posterior | Medium e.g. 16ms |
Research from the National Institutes of Health supports the importance of region-specific exposure settings in dental radiography. Too many offices do not vary exposure but leave the x-ray source on a single exposure.
Achieving Diagnostic Contrast and Clarity
Optimal contrast and clarity are essential for accurate interpretation of dental X-rays taken with digital intraoral sensors. Achieving this balance requires careful attention to exposure and processing techniques.
- Use the highest kVp (kilovoltage peak) setting possible while maintaining adequate contrast. Higher VP reduces patient dose and improves image quality. Some sensors give better results with 65KV while others may be best at 70KV. Check the intraoral sensor’s manufacturer’s recommendations to optimize dose.
- Adjust exposure time to fine-tune image density. Increase these factors for denser structures, decrease for less dense areas. Too much exposure results in burned out images while too little exposure results in light grainy images.
- Stabilize the x-ray head prior to exposure. A shaking tube will create a blurry x-ray.
- Employ digital image processing tools to enhance contrast and detail post-exposure. Be cautious not to over-process in the image return algorithms, which can introduce artifacts. Artifacts are typically encountered when too much sharpening is applied to an image resulting in subtle details coming to the forefront and perhaps causing an inaccurate diagnosis. By returning the image natively without sharpening, the clinician can add enhancement using post processing tools and always return to the original unenhanced image when needed.
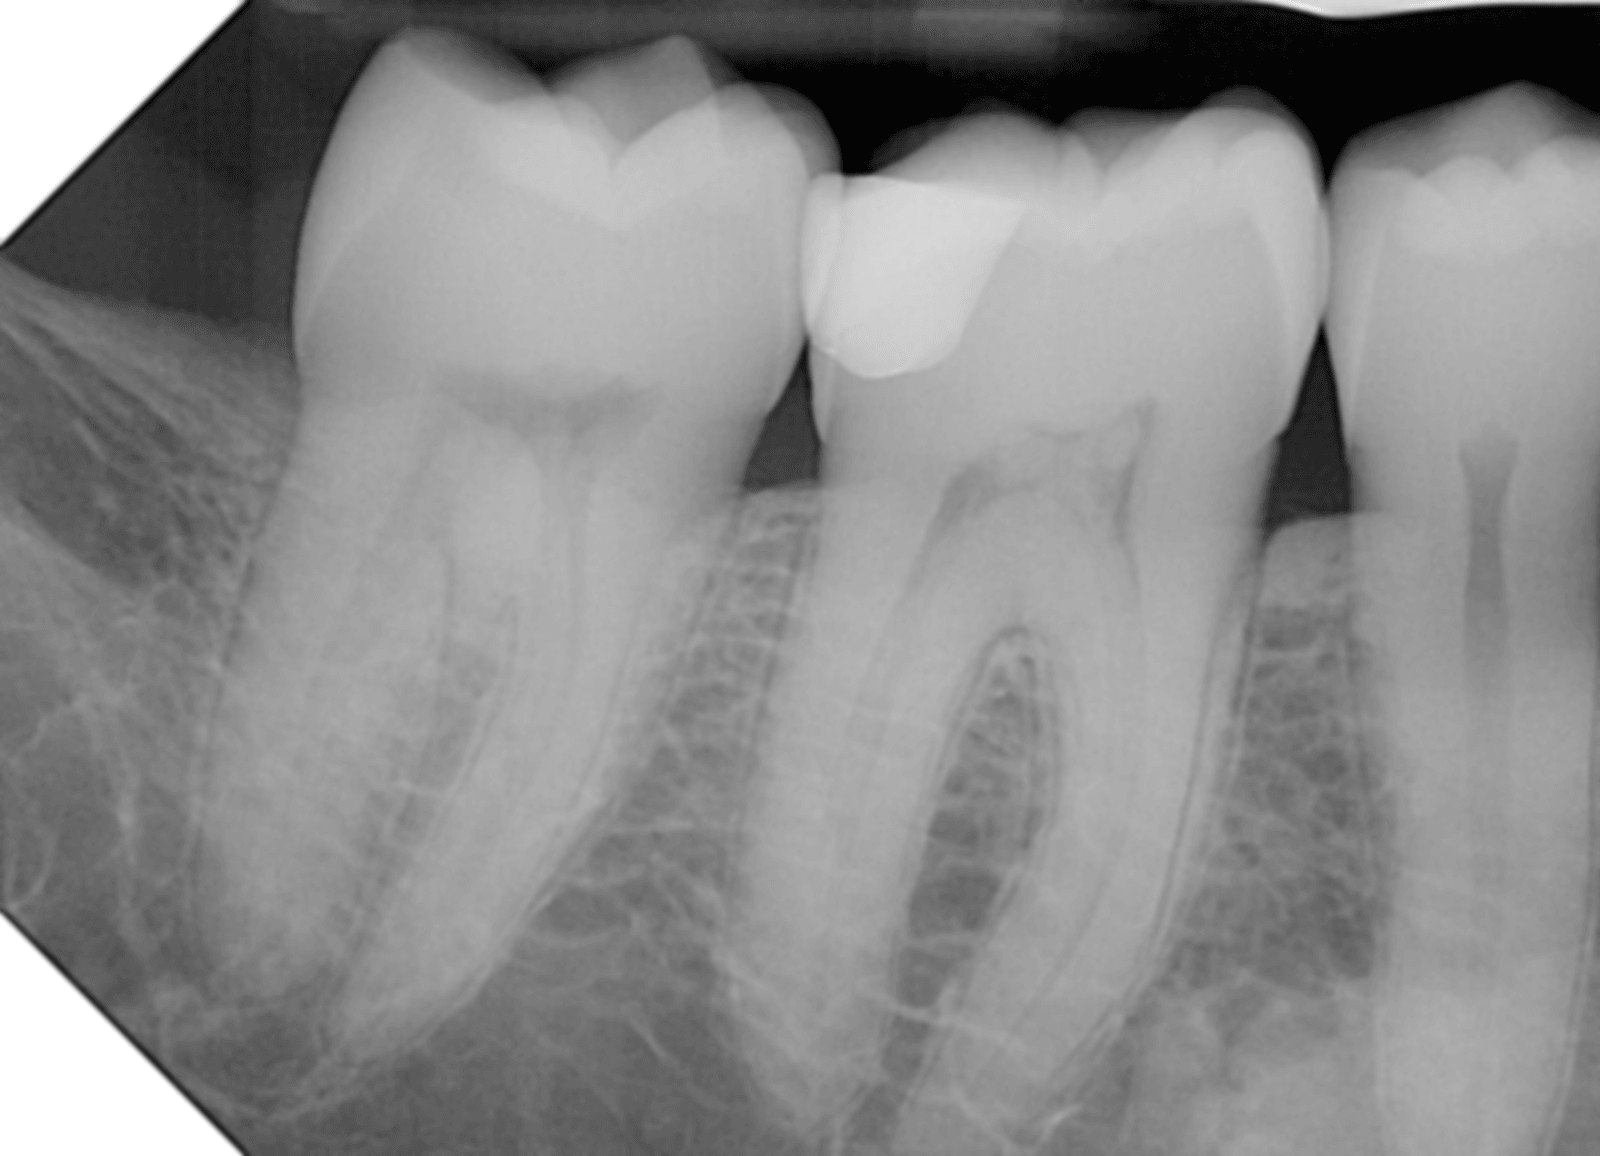 Minimally processed PrimeView Ultra x-ray with no post processing applied.
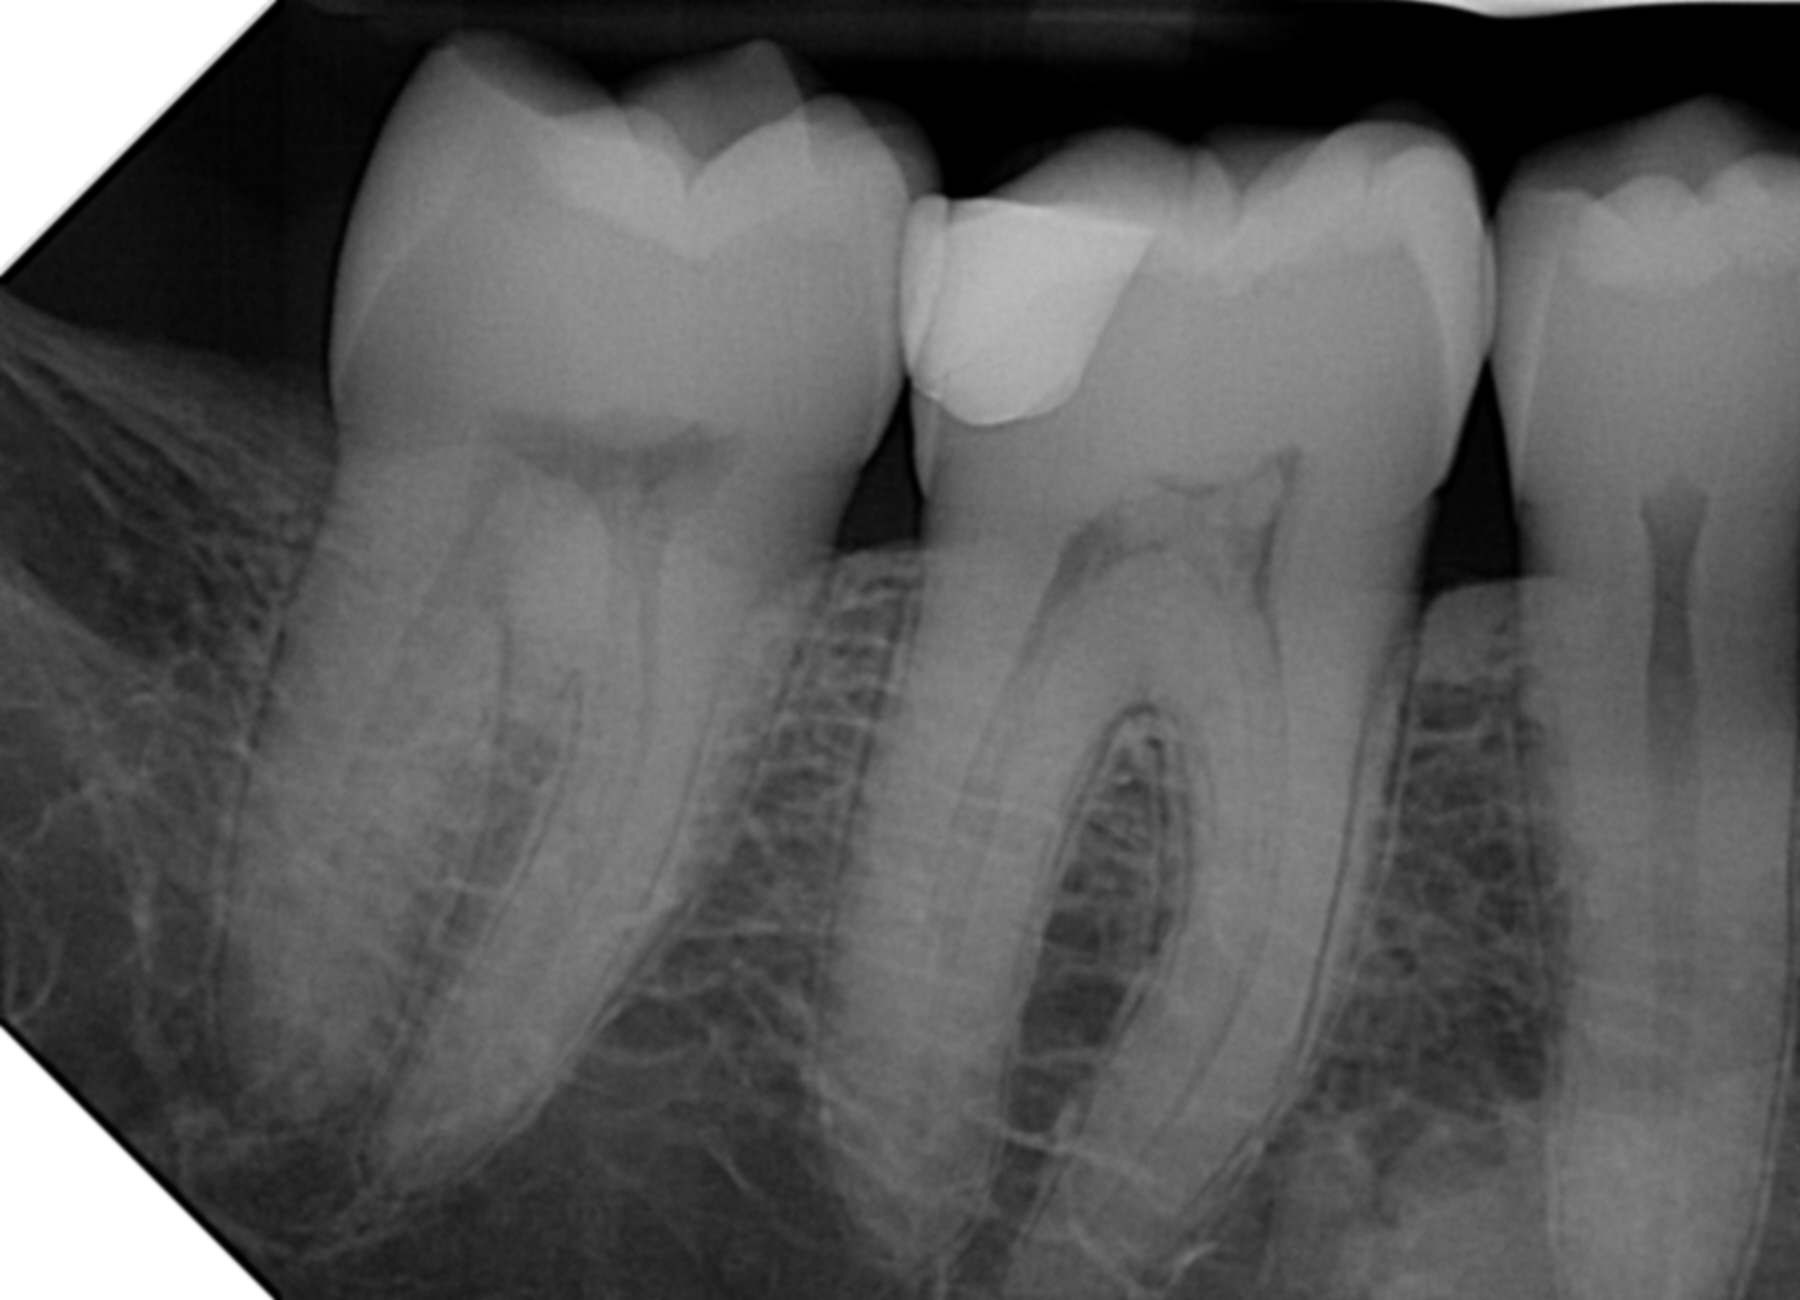 Same PrimeView Ultra image with post processing sharpening and contrast adjustments applied.
Intraoral X-ray Positioning for Comfort and Capturing Anatomy
- Employ a positioning holder system compatible with your sensor to achieve a correct perpendicular alignment to the sensor.
- Use a cotton roll when needed to allow the patient to stabilize the sensor at the required angle without discomfort.
- Use a 2x2 gauze to blanket Tori and keep the sensor from pushing into the Tori and causing discomfort.
- Place the sensor carefully and have the patient “slowly close” to stabilize rather than “bite down.”
- Have the patient swallow between each x-ray to help alleviate gagging.
 Using a cotton roll to help with patient comfort and capturing complete anatomy.
Positioning in Panoramic and CBCT Imaging for Success
Correct patient positioning is crucial for obtaining high-quality panoramic and CBCT images. This section covers key techniques to ensure optimal results and minimize artifacts.
Avoiding Shoulder Collision and Stabilizing
Shoulder collision can significantly impact image quality in panoramic and CBCT imaging, particularly when imaging posterior mandibular regions.
To prevent this issue:
- Position the patient’s chin on the chin rest, ensuring their neck is extended. Have the patient bite in the grooves of the bite-block which separates the teeth and puts both arches in the focal trough.
- Ask the patient to take a small step forward, bringing their shoulders away from the image receptor.
- Instruct the patient to stand with their back straight and shoulders relaxed.
- Align the Frankfort plane which results in a slight downward chin tilt.
- Check the C-Arm clearance between the patient shoulders and the arm. If in doubt, do a test with no exposure to ensure no shoulder collisions.
- Tighten the temple supports until the patient’s head is fully stabilized.
- If in the standing position, shoulder collision is inevitable, seat the patient and have them lean back and position the patients head in the supports. Leaning back puts the shoulders back and down and eliminates collisions.
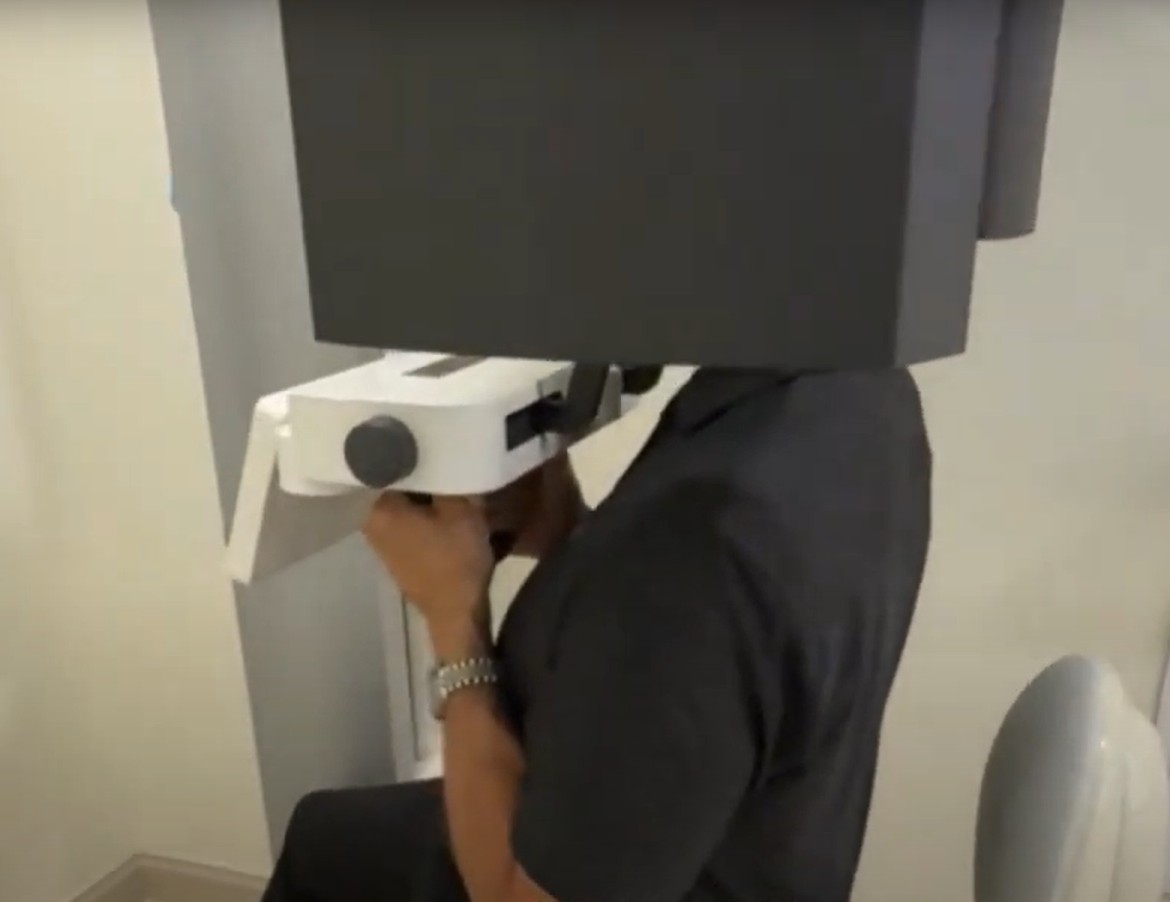 Patient seated with shoulders back having CBCT taken in J.Morita X800
Aligning the Midsagittal, Canine, and Frankfurt Planes
Proper alignment of the Midsagittal, Canine, and Frankfurt planes is essential for producing undistorted panoramic and CBCT images.
Many Panoramic and CBCT units have laser light beams that illuminate and trace lines on the patient’s face to aid in correct alignment.
The Midsagittal beam runs vertically and should bisect the patient’s face. If the patient is turned left or right the symmetry of a panoramic image will be affected with one side of the panoramic image appearing larger.
The Frankfurt plane (line from the ear canal to the lower border of the eye orbit) should also be parallel to the floor. Adjust the patient’s head tilt as needed. Normally slight downward tilt. Too much downward tilt will reduce in an exaggerated smile in the pan while the chin tilted up produces a frown. The horizontal laser allows connecting the laser beam from the lowest point of the orbit of the eye to the superior point of the external auditory meatus which defines the Frankfort plane.
The Canine beam is the vertical beam that should be positioned on the distal half of the canine. This positioning keeps the panoramic image in the focal trough, so all teeth are in focus. In CBCT imaging, this beam allows the CBCT to match the area being imaged with the FOV being used acquire the CBCT.
The Horizontal beam in a CBCT scan shows the middle of the volume of information. If the vertical aspect of the CBCT FOV is 80mm than the volume will capture 40mm above the line and 40mm below the line.
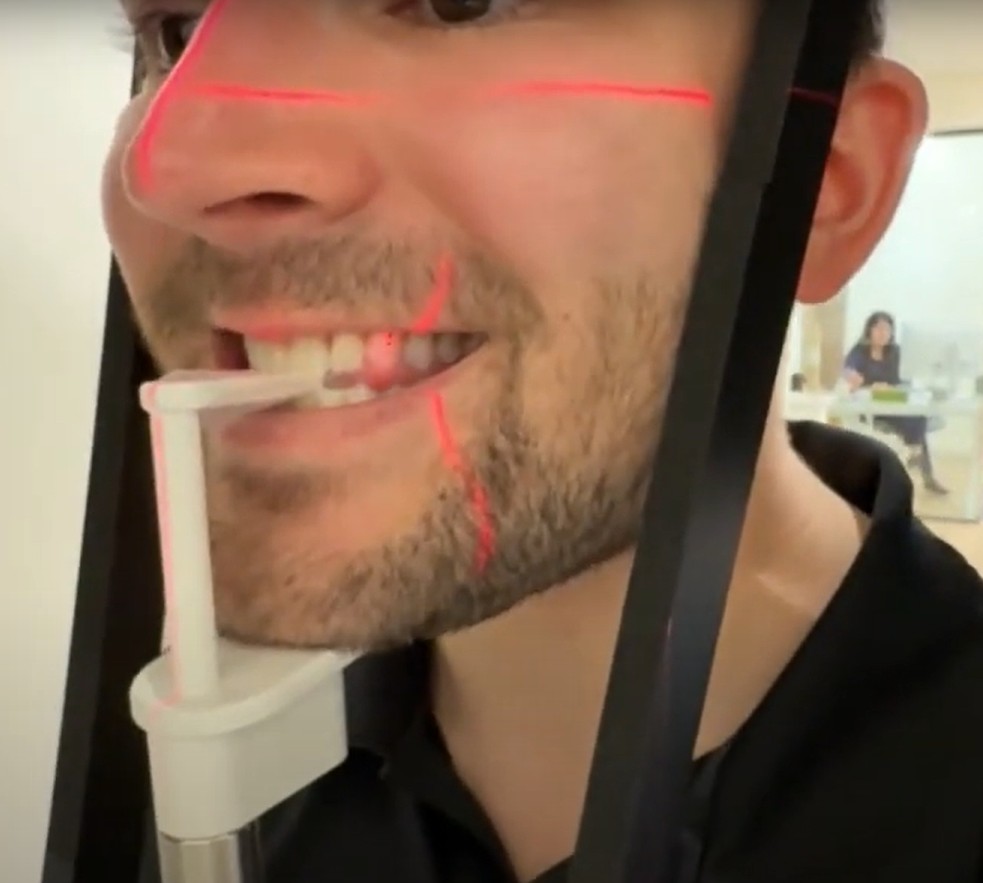 Laser beam alignment for panoramic imaging.
Mastering the art of dental image acquisition is not just about capturing clear images—it’s about elevating patient care, streamlining diagnostics, and building trust through precision and consistency. By implementing a structured, patient-centered imaging protocol, your practice doesn’t just improve outcomes—it transforms the patient experience. As technology advances, so should our techniques. Commit to continual refinement and let your imaging become a powerful reflection of your practice’s excellence and dedication and dedication to optimal oral health.
Your images tell the story—make sure they’re crystal clear. Trust Dental TI to bring decades of experience to your diagnostic process and elevate every patient conversation.